Wowzers.
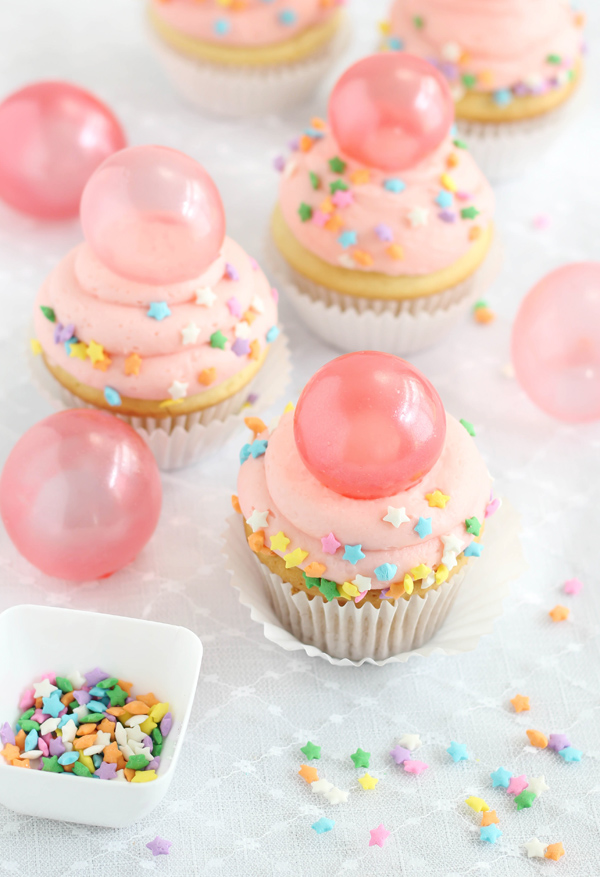
This recipe just made it to the top of our ‘cake bucket list’, we’re not even joking. A bubblegum cake inspired cupcake with an edible balloon on top? Come on, it doesn’t get much cooler than that.
This little gem is actually pretty achievable for the average baker. So there really isn’t a reason not to give it a go for your next party, or just for laughs. This particular example is obviously pink, but if you add little batman or dinosaur confetti and change the colour to blue – Bob’s your uncle. Don’t underestimate how easy it is to change things up a bit for boys and girls – if you love an idea, you can make it work!
What you’ll need for the balloons…
- Small balloons
- 2 packages (.25 oz each, about 2 tablespoons) powdered gelatin
- 1 or 2 drops liquid food color (I used 1 drop of red)
- 4 tablespoons cold water
- 1/8 teaspoon white or silver pearl luster dust
- Clear vegetable shortening
- Small artists’ brush
- Grid cooling rack
How to…
- Fill a balloon 1/3 to 1/4 full of air. Pinch the balloon at both ends (the blown up/bulbous end and the open end) and tie the two together. This will help the balloon achieve a more round, bubble-like shape. Repeat process with remaining balloons.
- Brush the balloons with a little vegetable shortening, then use your fingers to completely coat the balloon. Use a paper towel to wipe off most of the vegetable shortening you just applied. There will still be a very thin residue of shortening left behind. If too much of the shortening is left on the balloon, the gelatin will not stick!
- In a small microwave-safe bowl, quickly whisk together the gelatin, food color, luster dust and cold water. It will become thick almost immediately. Let gelatin stand 5 minutes.
- Heat the gelatin in the microwave for 10 seconds, or until it is completely melted. Let the mixture stand until lukewarm.
- Hold a balloon by the knot and dip it into the gelatin, rotating it to coat the sides and avoiding the knot. Hold the balloon upright (knot to the bottom) and allow the excess to drip back into the bowl. Transfer the balloon to the grid cooling rack knot-side down. (I placed the balloon knot into an open grid.) Allow the balloon to dry for 5-10 minutes. Repeat with remaining balloons. Re-dip balloons in the gelatin. You may need to re-heat the gelatin mixture in the microwave for 3-4 seconds. The balloons will feel rubbery at first, but will dry to a firm, crisp shell over a 24 hour period.
- Once the balloons are completely dry, you can remove the balloon. Start by snipping a hole with scissors right beside the tied knot. As the air escapes, the balloon should pull away from the sides of the gelatin. Using the scissors again, cut a larger hole in the bottom of the balloon and pull the balloon out with your fingers. If the gelatin layer is too thin, it may collapse. This happened to me a couple of times, but I was able to pop them back into place from the inside.
- Place the bubbles cut-side-down when decorating. They can be used on buttercream and attached to fondant with piping gel or corn syrup.
- The bubbles will keep for a long time. Store them in an air-tight container or zip-top bag until ready to use.


What you’ll need for the cupcake…
- 1 cup granulated sugar
- 1/2 cup/113g unsalted butter
- 2 large eggs
- 1 tablespoon vanilla extract
- 3/4 teaspoon salt
- 2 teaspoons baking powder
- 3/4 teaspoon baking soda
- 1 2/3 cups all-purpose flour
- 1/2 cup heavy cream
- 1/2 cup full fat sour cream
How to…
- Preheat oven to 350F. Line one cupcake pan with 12 paper liners, and a second cupcake pan with 3 liners.
- Beat together sugar and butter until lightened. Add the eggs one at a time, then increase mixer speed to high for two minutes or until batter is light and fluffy. Add the vanilla, salt, baking powder and soda; beat for another minute and scrape down the sides of the bowl.
- Stir together heavy cream and sour cream in a small bowl. Beginning and ending with flour, alternately add the flour and yogurt mixture. Beat well after each addition. Scrape down the sides of the bowl and beat again briefly.
- Spoon batter into the liners. Bake for 22-25 minutes, or until the cake springs back when pressed in the center. Let the cupcakes cool in the pan for 10 minutes, then turn out onto a wire rack to cool completely.


What you’ll need for the frosting…
- 1/2 cup/113g of unsalted butter, softened
- 1 cup/128g confectioners’ sugar
- 2-4 drops concentrated bubblegum candy flavour (to taste)
- Pastel star confetti sprinkles
- 15+ gelatin bubbles (see tutorial)
- * Milk or heavy cream, optional
- In a stand mixer fitted with the whisk attachment, mix together the butter and confectioners’ sugar. Begin mixing on low speed until crumbly, and then increase to high and beat for 3 minutes. Add the bubblegum flavor to taste and beat until light and fluffy.
- Transfer mixture to a piping bag fitted with a 1/2-inch round tip, or use a zip-top bag with the corner snipped. Pipe frosting onto cupcakes in a large mound and sprinkle on the star confetti. Top each cupcake with one (or more!) gelatin bubble.


Leave A Comment